Dein Warenkorb ist gerade leer!
User Manual VR Headset Wireless Charging Station
Model Number: ATOMS-VRIC-1.4
Date: 11-11-24
Design: Raphael Haus
Contents
- Components Overview
- Installation Guide
- Technical Specifications
- Safety, Maintenance and Care
- Waste Reduction and Recycling
Disclaimer: Products may vary slightly from the images and descriptions provided. Please verify the model number to ensure you have the correct components.
1. Components Overview
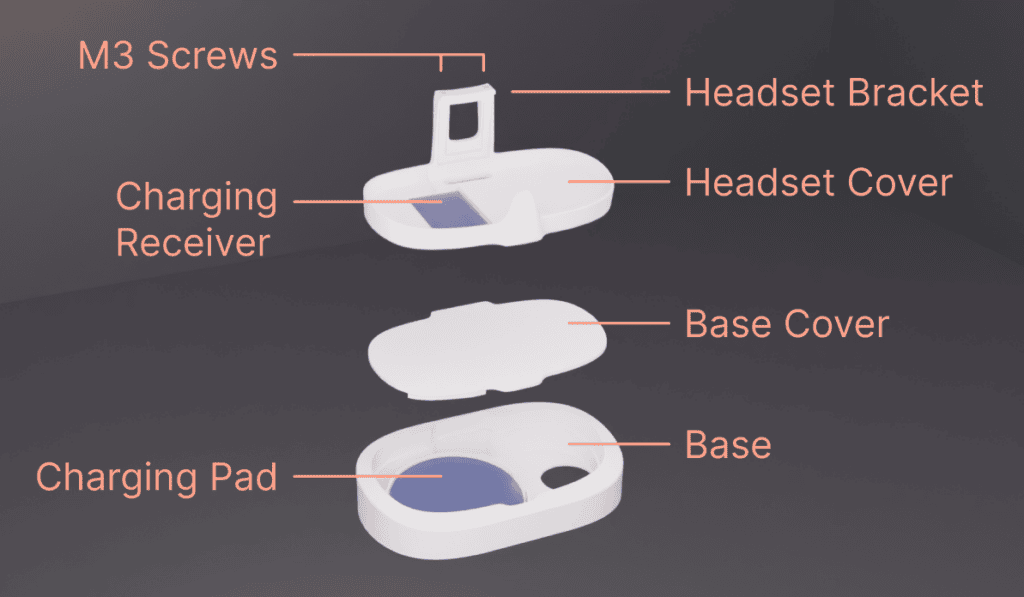
The charging station includes the following parts:
- Base Part: Contains the primary charging pad (Anker model A2503) with:
- Hidden Cable Management: Internal cable routing with an exit at the bottom. For optimal concealment, consider drilling a matching hole in your desk for invisible cable routing, enhancing design and installation safety.
- Base Cover: Removable cover that conceals screws for a clean look when reattached.
- Headset Cover: Custom-designed for the Pico G3 VR headset, secures the charging receiver and maintains the headset’s appearance. Key features include:
- Charging Receiver Integration: Connect the charging receiver (NILKIN NJ020) via USB-C before attaching the cover. The receiver remains hidden, enabling wireless charging on the base station.
- Non-Invasive Attachment: The cover is secured with a hook behind the headset edge and a top clip with two screws (use a 2.5 mm Allen wrench) for firm attachment without altering the headset’s structure.
To charge, simply place the headset with the attached cover and receiver onto the base station.
2. Installation Guide
Setting Up the Base Station:
- Place the base on a stable, flat surface.
- Lift the base cover to expose screw holes if securing to a surface.
- Secure the base to your table with screws.
- Route the charging cable through the bottom exit and, if desired, through a hole in your desk for concealed wiring.
- Reattach the base cover to hide the screws.
- Connect the USB cable to a power adapter.
Attaching the Headset Cover:
- Connect the charging receiver (NILKIN NJ020) to the Pico G3 headset’s USB-C port.
- Loosen screws on the top clip and remove the bracket.
- Position the lower hook of the cover behind the headset edge.
- Tighten the screws to secure the cover and receiver in place.
Charging the Headset:
- Place the headset with the cover and receiver onto the base for automatic charging.
3. Technical Specifications
3D Prints
- Material: EcoPLA Plastic – a more sustainable, biodegradable option.
- Printed in Germany
Charging Pad (Anker PowerWave A2503):
- Input: 5V/2A or 9V/2A
- Output: 10W Max
- Frequency: 110 – 205 kHz (TX/RX)
- Qi Wireless Charging Standard
- Compliance: EU and FCC
- Made in China
Charging Receiver (NILKIN NJ020):
- Output: 5V, 1A Max
- Efficiency: 70%
- Qi Wireless Charging Standard
- Made in China
4. Safety, Maintenance and Care
- Power Supply Requirements: Use a Quick Charge 3.0 adapter with at least 5V 2A or 9V 2A. Low-powered adapters (e.g., Apple’s 5V 1A) may not be sufficient.
- Modified Internal Components: The Anker PowerWave Pad and charging receiver have been modified for integration, reducing original sealing. Handle carefully to prevent dust or liquid ingress and avoid excessive handling.
- Avoid Excessive Force: The base and cover fit by friction. Avoid applying excessive force to prevent damage.
- Dust, Moisture, and Debris Protection: Protect the device from dust, moisture, and other debris to maintain optimal performance.
- Indoor Use Only
- Safety Checks: Inspect periodically to ensure all parts are securely attached and the cable is undamaged.
- Environmental Care: Keep the station in low-humidity, moderate-temperature areas to ensure performance and longevity.
5. Waste Reduction and Recycling
To minimize waste, all plastic parts are made from recyclable EcoPLA. At the end of the product’s life, recycle each part following local e-waste and plastic recycling guidelines. Aim to reduce your carbon footprint by reusing components where possible.
DEUTSCH
Benutzerhandbuch VR Headset Wireless Charging Station
Modellnummer: ATOMS-VRIC-1.4
Datum: 11-11-24
Design: Raphael Haus
Inhaltsverzeichnis
- Komponentenübersicht
- Installationsanleitung
- Technische Daten
- Sicherheit, Wartung und Pflege
- Abfallreduzierung und Recycling
Haftungsausschluss: Produkte können leicht von den Abbildungen und Beschreibungen abweichen. Bitte überprüfen Sie die Modellnummer, um sicherzustellen, dass Sie die richtigen Komponenten haben.
1. Komponentenübersicht
Die Ladestation enthält folgende Teile:
- Basis: Enthält das Haupt-Ladepad (Anker Modell A2503) mit:
- Versteckte Kabelführung: Internes Kabelmanagement mit Ausgang am Boden. Für optimale Kabelverdeckung können Sie ein passendes Loch in Ihrem Tisch bohren, um das Kabel unsichtbar zu verlegen und Sicherheit und Design zu verbessern.
- Basisabdeckung: Abnehmbare Abdeckung, die Schrauben verdeckt und für ein sauberes Erscheinungsbild sorgt.
- Headset-Abdeckung: Speziell für das Pico G3 VR-Headset entworfen, sichert den Ladereceiver und erhält das Erscheinungsbild des Headsets. Hauptfunktionen:
- Receiver-Integration: Verbinden Sie den Receiver (NILKIN NJ020) über USB-C, bevor Sie die Abdeckung anbringen. Der Receiver bleibt versteckt und ermöglicht kabelloses Laden auf der Basisstation.
- Nicht-invasives Befestigen: Die Abdeckung wird durch einen Haken und eine obere Klemme (mit 2 Schrauben, 2,5 mm Inbusschlüssel) befestigt, ohne das Headset zu verändern.
Zum Laden das Headset mit Abdeckung und Receiver auf die Basis legen.
2. Installationsanleitung
Basisstation aufstellen:
- Die Basis auf eine stabile, flache Oberfläche stellen.
- Basisabdeckung anheben, um Schraubenlöcher freizulegen, wenn die Basis befestigt werden soll.
- Basis mit Schrauben am Tisch befestigen.
- Ladekabel durch den Ausgang am Boden und ein mögliches Loch im Tisch führen.
- Basisabdeckung wieder anbringen.
- USB-Kabel mit einem Lade-Adapter verbinden.
Headset-Abdeckung anbringen:
- Receiver (NILKIN NJ020) an den USB-C-Port des Pico G3 Headsets anschließen.
- Schrauben der oberen Klemme lösen und Halterung entfernen.
- Den unteren Haken der Abdeckung hinter die untere Kante (Nasenbereich) des Headsets setzen.
- Headset in die finale Position bringen und die Schrauben anziehen, um die Abdeckung und den Receiver zu sichern.
Laden des Headsets:
- Headset mit der montierten Abdeckung und dem Receiver auf die Basis legen, um automatisch zu laden.
3. Technische Daten
3D-Drucke
- Material: EcoPLA Kunststoff – nachhaltiger und biologisch abbaubar.
- Hergestellt in Deutschland
Ladepad (Anker PowerWave A2503):
- Eingang: 5V/2A oder 9V/2A
- Ausgang: 10W Max
- Frequenz: 110 – 205 kHz (TX/RX)
- Qi Standard
- EU und FCC konform
- Hergestellt in China
Receiver (NILKIN NJ020):
- Ausgang: 5V, 1A Max
- Effizienz: 70%
- Qi Standard
- Hergestellt in China
4. Sicherheit, Wartung und Pflege
- Stromanforderungen: Verwenden Sie einen Quick Charge 3.0 Lade-Adapter mit mindestens 5V 2A oder 9V 2A. Schwache Adapter (z. B. Apples 5V 1A) könnten nicht ausreichend sein.
- Modifizierte Komponenten: Das Anker PowerWave Pad und der Ladereceiver wurden modifiziert. Das Originalgehäuse ist nicht mehr garantiert staub- oder wasserdicht. Vorsichtig behandeln.
- Sorgfältige Handhabung: Bitte gehen Sie beim Zusammenbau und Auseinanderbau mit den Teilen sorgsam um, um mögliche Beschädigungen zu vermeiden, da Kunststoffteile bei übermäßiger Kraftanwendung oder Stößen, wie beispielsweise durch einen Sturz, reißen oder brechen können.
- Schutz vor Staub, Feuchtigkeit und Schmutz: Schützen Sie das Gerät vor Staub, Feuchtigkeit und anderen Verunreinigungen, um eine optimale Leistung zu gewährleisten.
- Sicherheitschecks: Regelmäßig prüfen, ob alle Teile fest sitzen und intakt sind.
- Umweltbedingungen: Lagern Sie die Station in trockenen, gemäßigten Bereichen.
- Nur für Innenräume geeignet
5. Abfallreduzierung und Recycling
Um Abfall zu minimieren, sind alle Kunststoffteile aus recycelbarem EcoPLA gefertigt. Am Ende der Lebensdauer des Produkts sollten alle Teile gemäß den lokalen Richtlinien für Elektronik- und Kunststoffrecycling recycelt werden. Streben Sie an, Ihren CO2-Fußabdruck zu reduzieren, indem Sie Komponenten, wo möglich, wiederverwenden.